Introduction to Halloween Dirt Cups
Halloween is that exciting time of the year when creativity, whimsy, and a touch of fright come together. As the leaves change color and the air crisps with an autumn chill, it’s the perfect occasion to indulge in spooky yet delightful treats. One of the most joyous and visually striking options to consider is Halloween Dirt Cups. These playful desserts not only please the palate but also ignite the imagination!
Why Halloween Dirt Cups are a Spooktacular Treat?
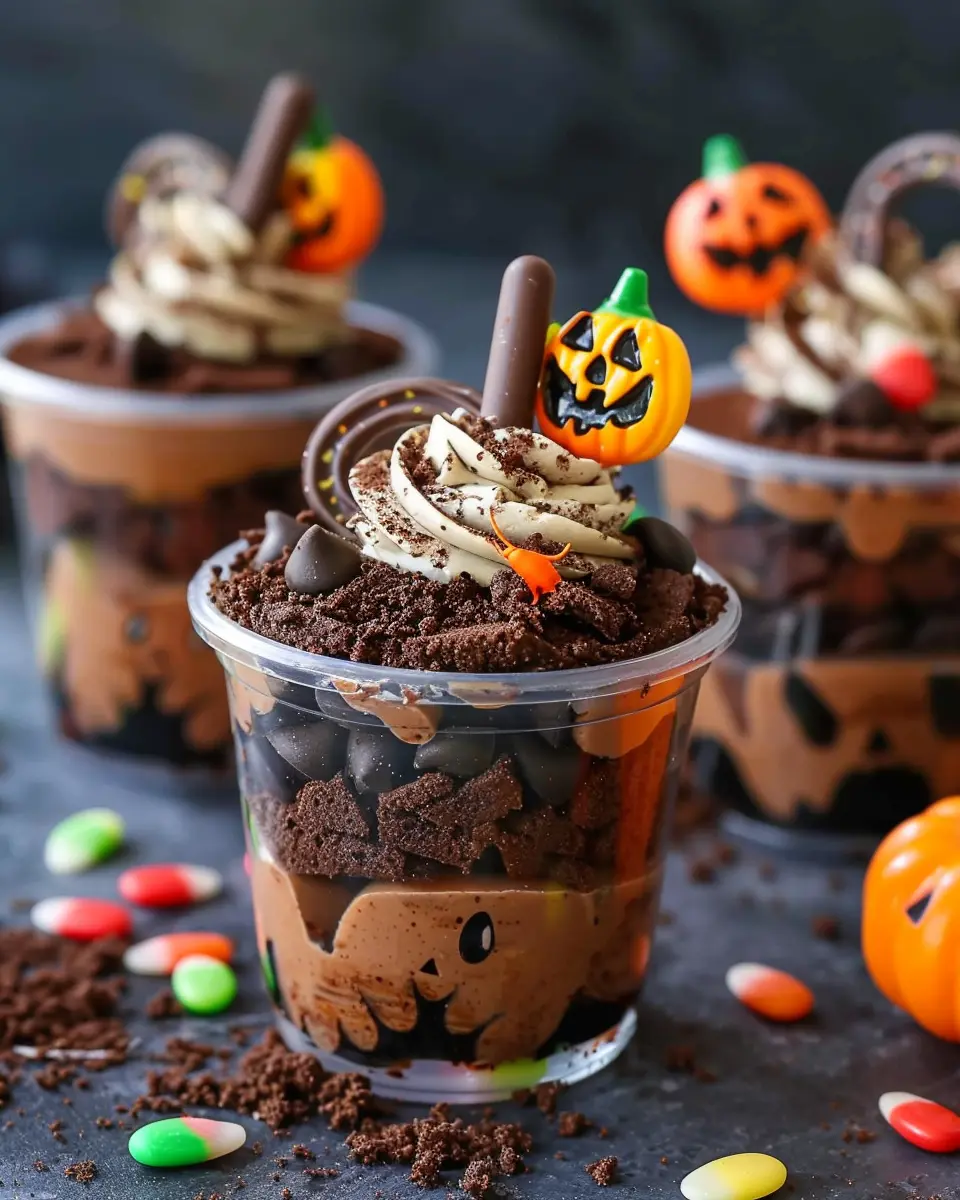
Dirt cups are a fan favorite, especially among young professionals looking to bring a little festivity to their gatherings. But what makes these cups so special? For starters, the layered look of chocolate pudding, crushed cookies, and gummy worms is visually captivating—a true feast for the eyes. Whether you’re hosting a Halloween-themed party or simply want to treat yourself after a long week, these cups are a fun and easy option!
Here’s a perk: making Halloween Dirt Cups is incredibly straightforward, allowing you to whip them up in no time. You can even get your friends involved in the preparation, making it a perfect activity for a cozy Halloween night. Baking expert and author Sally McKenney once mentioned the joy of making treats with friends, emphasizing how shared experiences enhance the enjoyment of food.
Another reason to love these cups is their delightful versatility. You can customize them based on your preferences or dietary needs. For instance, consider using dairy-free pudding or gluten-free cookies—there’s no limit to how creative you can get! The only requirement is a good sense of fun!
Finally, Halloween Dirt Cups are an easy way to embrace the spirit of the season without overwhelming yourself. With a bit of imagination, these sweet treats can become the highlight of any Halloween celebration, and they’ll surely leave a lasting impression on your guests.
As we dive into the recipe for Halloween Dirt Cups, get ready to unleash your creativity and, most importantly, have fun along the way! After all, isn’t that what Halloween is all about?
Ingredients for Halloween Dirt Cups
Creating Halloween Dirt Cups is all about the right mix of spooktacular ingredients. Let’s break it down into what you need for the base and fun toppings to make your treat unforgettable.
Essential ingredients for your base
To build the delicious base of your Halloween Dirt Cups, you’ll need:
- Chocolate pudding: Rich and creamy, it serves as the “dirt” layer.
- Crushed chocolate cookies: Think Oreos! These will give you that perfect gritty texture that looks like dirt.
- Whipped cream: Lighten things up with a layer atop the pudding, adding sweetness and a lovely texture.
The combination of these ingredients will create a luscious foundation for your Halloween creation, making every bite a delight.
Fun toppings to make it festive
Now comes the best part—adding some creative toppings to turn your Halloween Dirt Cups into showstoppers:
- Gummy worms: Classic and creepy!
- Candy spiders: Perfect for that extra fright.
- Halloween sprinkles: For some festive color and fun!
- Chocolate graveyard markers: Edible decorations that really tie the theme together.
With these ingredients, you can customize your Halloween Dirt Cups to impress guests at any Halloween gathering. For more fun ideas, check out resources from Food Network and Taste of Home.
So, mix, match, and make your Halloween dessert one to remember!
Step-by-Step Preparation of Halloween Dirt Cups
Creating Halloween Dirt Cups is a delightful way to get into the festive spirit while enjoying a simple yet indulgent treat. Whether you’re hosting a Halloween party or just looking to make something fun for the kids, these layered desserts are sure to impress. Let’s break down the preparation process step by step.
Gather your ingredients
Before diving into the action, ensure you have everything you need. Here’s your shopping list for those delectable Halloween Dirt Cups:
- Chocolate pudding (instant or homemade)
- Chocolate sandwich cookies (like Oreos)
- Gummy worms or other spooky candies
- Whipped topping (like Cool Whip)
- Plastic cups or jars for serving
- Optional: Halloween-themed decorations, like edible eyes or sprinkles
Having all your ingredients ready makes the process smooth and enjoyable. Trust me, nothing spoils the fun faster than running to the store halfway through!
Prepare the chocolate pudding
Let’s kick things off by preparing the chocolate pudding, which is the star of our show. If you’re using instant pudding, just mix the pudding mix with cold milk in a bowl according to the package instructions—usually about 2 cups of milk for one box of pudding. Stir it for a couple of minutes until it thickens.
If you’re feeling adventurous, consider making homemade chocolate pudding for a richer flavor. You can check out this chocolate pudding recipe for a scratch-made option. Once your pudding is ready, place it in the fridge to chill.
Crush the cookies for the “dirt”
Now it’s time to create the “dirt” for our Halloween Dirt Cups. Place the chocolate sandwich cookies into a large resealable bag and crush them using a rolling pin, or simply process them in a food processor until they resemble coarse crumbs. This is the moment to have some fun—let out any frustrations from the week!
Make sure to save a few whole cookies for garnishing later. If you want to lighten up the process, you can also use a blender or food processor. Simply check out this cookie crushing guide for pro tips.
Layering the cups
Once we have our pudding chilled and cookies crushed, it’s time to start layering our Halloween Dirt Cups. Grab your plastic cups or jars, and begin with a layer of chocolate pudding at the bottom—about a third of the cup should suffice.
Next, sprinkle a generous layer of the crushed Oreo cookies over the pudding to create that earthy look. Repeat this process until your cups are filled, ending with a final layer of cookie crumbs on top. The contrast in texture between the creamy pudding and the crunchy cookies is absolutely heavenly!
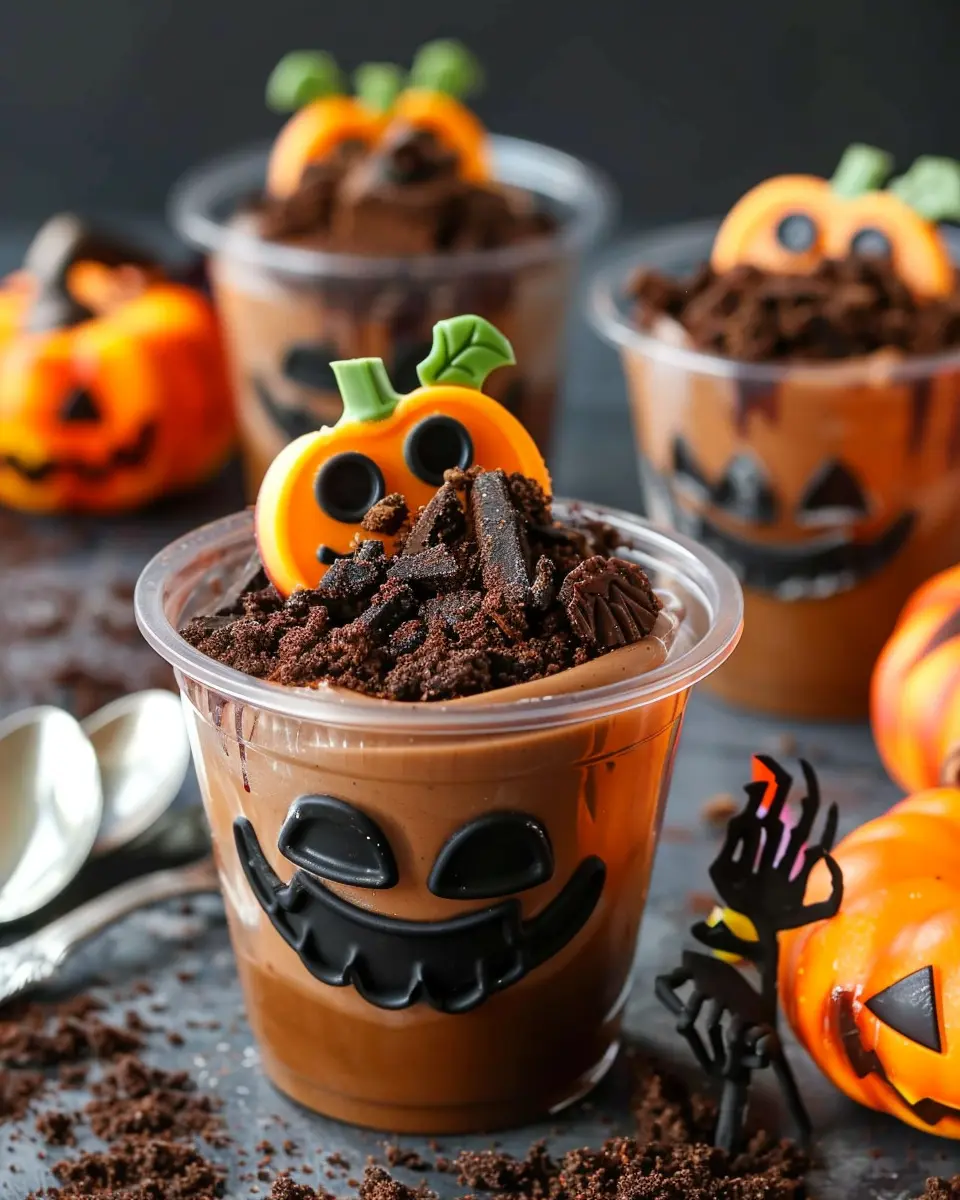
Add spooky decorations
To make your desserts truly festive, it’s time to unleash your creativity with spooky decorations. Gently press gummy worms into the cookie layer for an eerie touch. You can also sprinkle edible eyes or seasonal candies on top for added flair.
Another fun idea is to use a piping bag to pipe some whipped topping onto the top layer, giving it a spooky “frosting” effect. You could even use a parchment paper cone to create fun designs. Whatever you choose, make sure to have fun with it—there are no limits to your creativity!
In just a few steps, you’ve transformed simple ingredients into irresistibly cute and delicious Halloween Dirt Cups. So go ahead, indulge, and share your creations on social media! Your friends are going to be impressed when they see (and taste) what you’ve whipped up this Halloween. Happy haunting!
Fun Variations on Halloween Dirt Cups
Halloween is the perfect time to get a little creative in the kitchen, especially when it comes to making Halloween Dirt Cups. While the classic version is delightful, trying out some fun variations can make your Halloween gathering even more festive and exciting. Let’s dive into two crowd-pleasing twists that are sure to impress!
Pumpkin Spice Dirt Cups
If you’re a fan of the warm, comforting flavor of pumpkin spice, this variation will be your new favorite. Start with a base of spiced pumpkin puree mixed with vanilla pudding for that delicious autumn flavor. Layer it with crushed ginger snap cookies instead of traditional Oreos for a delightful crunch. Here’s how to whip them up:
- Ingredients: Pumpkin puree, vanilla pudding, pumpkin spice, ginger snap cookies.
- Assembly: In clear cups, alternate layers of the pumpkin mixture and crushed cookies. Top with whipped cream and a sprinkle of cinnamon for that final festive touch.
Not only does this version bring a seasonal flair, but it’s also an excellent way to sneak more vegetables into dessert—a win-win!
Ghostly Vanilla Pudding Cups
These Halloween Dirt Cups will bring a little bit of spooky fun to your table! Start with your classic vanilla pudding as the base, then layer it with crushed chocolate cookies to resemble dirt. Here’s where it gets fun: add some ghostly charm with marshmallow whip-style ghosts on top.
- Instructions: Use your favorite vanilla pudding recipe, layering with crushed chocolate cookies for that dirt effect. Instead of traditional decorations, pipe ghostly faces with marshmallow fluff. You can also use edible eyes for added whimsy.
Not only do these look fantastic, but they also taste like a heavenly blend of creamy and crunchy. Feeling creative? Check out this article on other Halloween-themed desserts here for even more ideas!
So grab your ingredients, and let’s make this Halloween unforgettable with these fun variations on Halloween Dirt Cups!
Cooking Tips and Notes for Halloween Dirt Cups
Creating delightful Halloween Dirt Cups can be a fun activity, but a few common mistakes can throw off your spooky creations. Here’s how to keep things rad and tasty!
How to Avoid Common Mistakes
- Layering: Make sure your layers of pudding and crushed cookies are even. It’s tempting to pile it high, but too much can make them top-heavy.
- Timing: Don’t add the gummy worms or desired toppings too early; they can get soggy. Wait until just before serving to keep that delightful texture.
- Chilling: Allow your Halloween Dirt Cups to chill for at least an hour before serving. This not only helps the flavors meld but also thickens the pudding.
Storage Tips for Freshness
To keep your Halloween Dirt Cups fresh, store them in airtight containers in the fridge. They can last for up to three days, but they’re best enjoyed within the first two. Feeling anxious about the whipped topping? Consider keeping it separate until serving to ensure it stays fluffy. For more on food storage, check out the USDA guidelines on refrigeration here.
Happy Halloween and happy cooking!

Creative Serving Suggestions for Halloween Dirt Cups
Ideas for Presentation
Transform your Halloween Dirt Cups into spooky showstoppers with a few creative twists! Consider using mini pumpkin or skull-shaped cups for an added festive flair. Decorating with crumbled chocolate cookies can mimic soil, while gummy worms and edible grave markers can elevate the theme. Don’t forget to sprinkle some spooky edible glitter or candy eyes on top to make your desserts truly eye-catching.
For an easy yet impressive touch, serve them in mason jars layered with whipped topping and your “dirt.” This transparent display allows guests to see the delightful layers, creating an inviting centerpiece that sparks conversation. How about a themed table setting? Use orange and black napkins, or scatter some fake spider webs for an added touch!
Perfect Occasions to Serve
Halloween Dirt Cups are a delightful treat for various occasions beyond Halloween parties. They’re perfect for school-themed bake sales, children’s birthday parties, or even a casual movie night with friends. The versatility of this dessert means you can adjust the theme to fit occasions like a spooky brunch or a cozy fall gathering.
Whether you’re looking to impress or simply bring joy to your loved ones, these cups are a playful choice. Why not invite some friends over and host a “make your own dirt cups” night? This interactive experience will definitely leave lasting memories! For more festive ideas and tips, check out seasonal blogs or guides on party planning here.
Time Breakdown for Halloween Dirt Cups
Preparation Time
Making Halloween Dirt Cups is a delightful process that kicks off with just 15 minutes of preparation. During this time, you’ll gather all your ingredients—think chocolate pudding mix, crushed Oreo cookies, and gummy worms. A little organization at the start helps everything flow smoothly.
Assembly Time
Once you have everything ready, it’s simply a matter of 10 minutes to assemble your spooky treats! Layer the pudding with the crushed cookies, and top it off with those fun gummy worms. It’s quick, easy, and totally satisfying.
Total Time Required
In just 25 minutes, you’ll have your own festive batch of Halloween Dirt Cups. Perfect for a last-minute party treat or a fun activity with friends, these cups are approachable yet impressive. So, what are you waiting for? Gather your ingredients, and let’s get to creating these delicious concoctions! For a visual guide to similar creations, check out this Halloween recipe guide.
Nutritional Facts for Halloween Dirt Cups
When indulging in spooky treats like Halloween Dirt Cups, knowing the nutritional content can help you enjoy them guilt-free. Let’s delve into the details!
Calories per serving
Each serving of these delightful Halloween Dirt Cups packs approximately 250 calories. This makes them a fun yet reasonable treat for your Halloween festivities. Plus, they’re rich in textures and flavors without heavy guilt!
Protein and other nutritional details
While they may be a dessert, Halloween Dirt Cups can offer more than just sweetness! Here’s a quick breakdown:
- Protein: Approximately 4g per serving (thanks to the creamy layer of whipped topping!)
- Fiber: Around 2g, depending on the amount of crushed cookies used.
- Sugars: Tailoring the recipe can help reduce sugar content if desired.
If you want to learn more about general nutritional guidelines, check out the U.S. Department of Agriculture for trusted resources. With these Halloween Dirt Cups, you can satisfy your cravings and share a fun dessert with friends, without sacrificing nutrition. Enjoy crafting these spooky delights!
FAQ about Halloween Dirt Cups
How can I make these ahead of time?
Planning a spooky gathering and want to cut down on last-minute prep? You can definitely make Halloween Dirt Cups ahead of time! Simply assemble your cups with the pudding, crushed cookies, and gummy worms, then cover them with plastic wrap and store them in the fridge. They can be made up to 24 hours in advance. Just keep in mind that the cookie topping may lose a bit of its crunch if stored for too long. For best results, you might want to add the cookies just before serving for that delightful texture contrast.
What can I use instead of gelatin?
If you’re looking for a gelatin-free option, don’t worry! Substituting gelatin is easy, especially with the rise of plant-based alternatives. Look for agar-agar, a seaweed-derived ingredient that mimics gelatin perfectly. Another great option is carrageenan, which offers a similar consistency. Both options are effective and can be found in most health food stores or online. Think about using a vegan pudding mix to maintain that Halloween Dirt Cups vibe while keeping it plant-based!
Are there any allergen-friendly options?
Absolutely! Making Halloween Dirt Cups allergen-friendly can be a fun challenge that adds an inclusive spin to your party. To cater to gluten-free friends, use gluten-free cookies for that authentic dirt effect. For dairy-free needs, choose plant-based pudding and coconut cream. Also, look for allergen-free chocolate options as a substitute for standard ingredients. If you’re interested in more tips, websites like the Snack Safely offer great resources for allergen-friendly recipes.
Engaging with these options lets everyone enjoy these festive treats, ensuring no one feels left out at your Halloween bash!
Conclusion on Halloween Dirt Cups
Why you should try making them this Halloween!
Halloween Dirt Cups are not just a treat; they’re an experience! Imagine gathering with friends or family and diving into a layered dessert that’s both adorable and delicious. They’re incredibly simple to make, and you can customize them to suit all tastes—feel free to swap in your favorite candies or fruits.
Plus, they bring a festive touch to any gathering. Whether you’re hosting a party or surprising your coworkers, these cups are sure to delight. For tips on more fun Halloween recipes, check out resources like Brit + Co or Food Network. So, why not whip up some Halloween Dirt Cups this season? Let the spooky fun begin!
PrintHalloween Dirt Cups: Easy and Fun Treats for Spooky Celebrations
These Halloween Dirt Cups are a delicious and spooky treat perfect for any Halloween celebration!
- Prep Time: 15 minutes
- Cook Time: 0 minutes
- Total Time: 15 minutes
- Yield: 4 servings 1x
- Category: Dessert
- Method: no-bake
- Cuisine: American
- Diet: vegetarian
Ingredients
- 1 package chocolate pudding mix
- 2 cups milk
- 12 ounces whipped topping
- 1 package chocolate sandwich cookies, crushed
- 1 cup gummy worms
Instructions
- In a bowl, whisk together the chocolate pudding mix and milk until smooth.
- Fold in the whipped topping until well combined.
- In serving cups, layer crushed chocolate cookies followed by the pudding mixture.
- Repeat the layers until the cups are full.
- Top with remaining crushed cookies and gummy worms.
Notes
- For added spooky effect, use Halloween-themed cups.
- Keep refrigerated until ready to serve.
Nutrition
- Serving Size: 1 cup
- Calories: 250
- Sugar: 20g
- Sodium: 150mg
- Fat: 12g
- Saturated Fat: 6g
- Unsaturated Fat: 6g
- Trans Fat: 0g
- Carbohydrates: 34g
- Fiber: 1g
- Protein: 3g
- Cholesterol: 20mg
Keywords: Halloween Dirt Cups, spooky treats, dessert, Halloween recipes